

Introduction
If you have ever wondered how to plant a tree and give it the best chance of living for fifty years or more, you are in the right place. Planting a tree looks simple: dig a hole, drop the tree in, add water. Yet studies of urban and community planting projects regularly find that a large share of young trees fail within the first few years, and most of those failures trace back to avoidable mistakes such as planting too deep, choosing the wrong species, or neglecting water in the first summer.
This tree planting guide walks you through the whole process from start to finish. You will learn when to plant, how to choose a healthy tree that suits your space, how to prepare the site, exactly how deep and wide to dig, how to water and mulch, and how to care for your tree through its first critical years. Whether you are planting a single sapling in a small garden or a row of trees along a property boundary, the principles are the same.
At Zero Waste Lifestyle, we believe that the most sustainable actions are often the simplest ones. A tree planted well captures carbon, cools your home, feeds wildlife, filters air and water, and keeps giving for generations, with almost no waste. Let us show you how to do it properly.
In this guide you will learn:
- Why planting trees matters for you and the planet
- The best time to plant a tree in different climates
- How to choose a tree and the right location
- The tools and materials you need
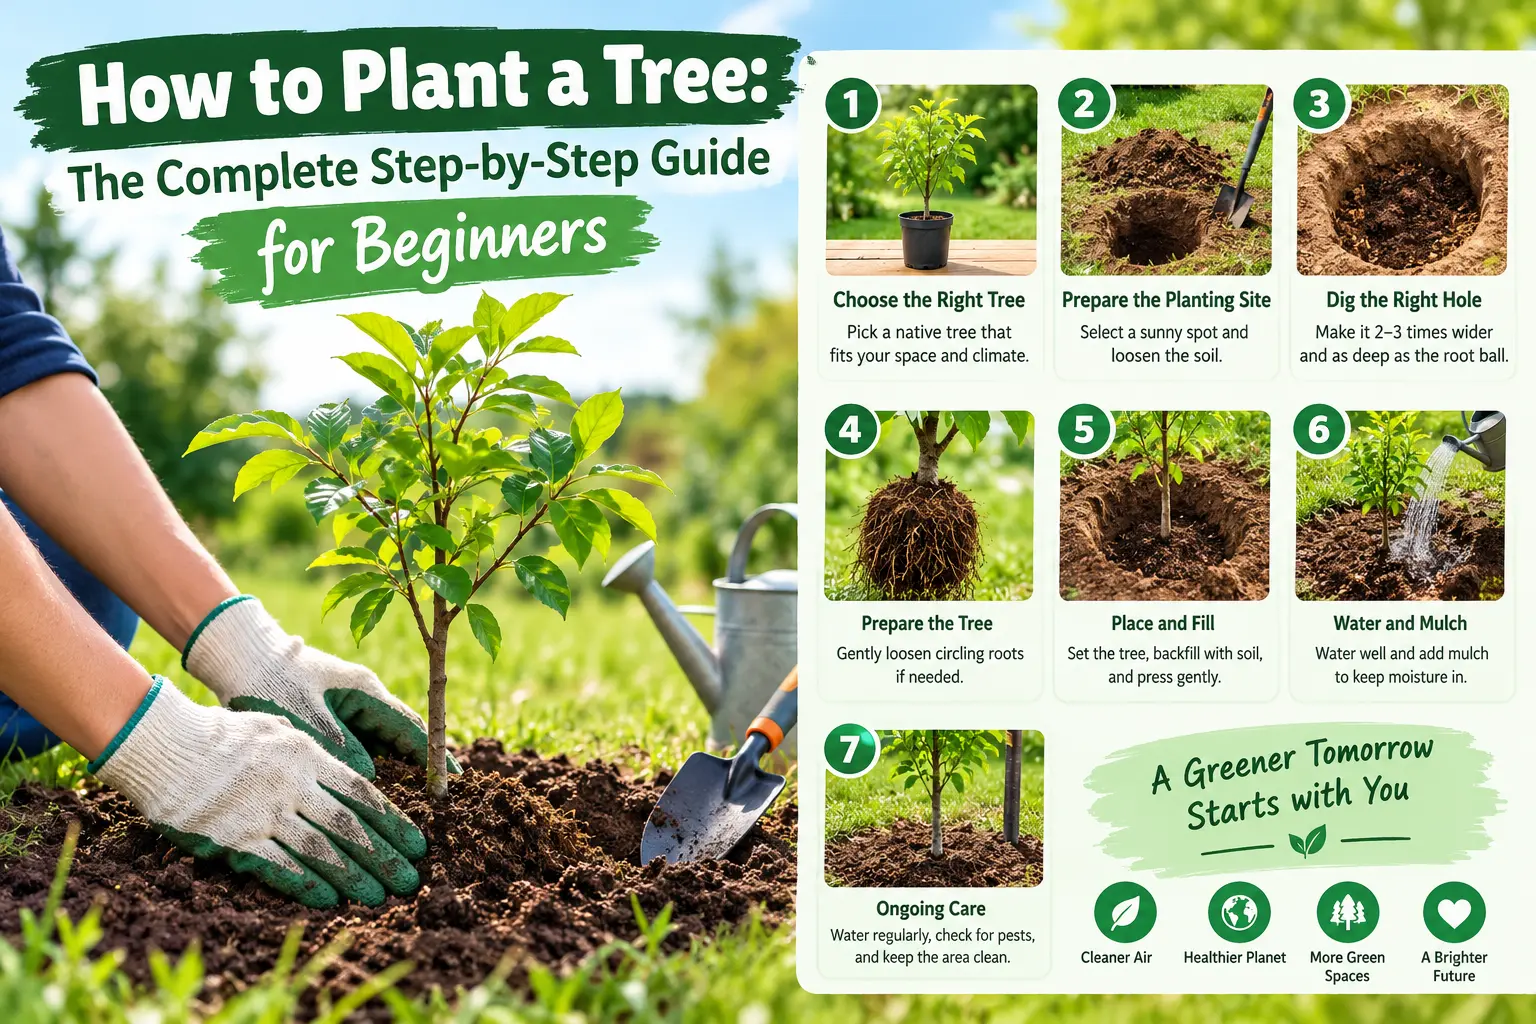
- How to plant a tree step by step
- How to water, mulch, stake, and prune
- The most common mistakes and how to avoid them
- Zero waste and eco-friendly planting habits
Why Planting a Tree Matters
Before we get into the practical details, it helps to understand why this small act is so valuable. A healthy mature tree is one of the hardest-working organisms in any landscape.
Environmental benefits
Carbon storage: Trees absorb carbon dioxide as they grow and store it in their wood, roots, and the surrounding soil. A single mature tree can absorb a meaningful amount of carbon each year, and long-lived species keep that carbon locked away for decades or centuries.
Cleaner air: Leaves trap dust, pollen, and pollutants and release oxygen. In cities, street trees measurably reduce particulate pollution at street level.
Cooler spaces: Shade and evapotranspiration can lower the temperature beneath a tree canopy by several degrees. A well-placed tree on the sunny side of a house can reduce summer cooling costs, and deciduous trees let winter sun through when you want warmth.
Water management: Roots and canopies slow rainfall, reduce runoff and erosion, and help rainwater soak into the ground. This lowers flood risk and recharges groundwater.
Habitat and biodiversity: A single native oak can support hundreds of insect species, which in turn feed birds, bats, and other wildlife. Even a small backyard tree becomes a stepping stone in a wildlife corridor.
Personal and community benefits
Trees improve mental wellbeing, reduce stress, and make neighborhoods more pleasant to live in. Properties with mature trees often hold higher value, and fruit or nut trees can supply food for your household. For families, planting a tree together creates a living memory that grows alongside the children.
A zero waste perspective
From a zero waste point of view, trees are a perfect example of a regenerative system. Fallen leaves become mulch and compost, prunings become kindling or habitat piles, and fruit feeds people and wildlife. Planting a tree is one of the few actions that creates more resources than it uses. We explore more ways to build low-impact habits on our zero waste living blog.
The Best Time to Plant a Tree
Timing is one of the most important tree planting tips you will ever receive. The best time to plant a tree is when the plant is dormant or when conditions give the roots time to establish before stress arrives. In most regions, that means autumn or early spring.
Autumn planting
For many temperate climates, early to mid autumn is ideal. The air is cooling, but the soil is still warm, so roots keep growing even after the leaves drop. By the time the next summer arrives, the tree has had months to settle in. Autumn planting also benefits from natural rainfall, which reduces how often you need to water.
Aim to plant at least four to six weeks before the ground freezes in your area so the roots have time to start anchoring.
Early spring planting
Early spring, as soon as the soil can be worked and before buds break, is the second-best window. The tree has a full growing season to establish. The trade-off is that you must pay close attention to watering as temperatures rise.
Summer and winter planting
Summer planting is possible with container-grown trees, but it demands consistent watering and carries more risk because heat stress and drought arrive before roots have spread. Winter planting is possible in mild climates where the ground does not freeze, particularly for bare-root trees, which are sold dormant.
Tropical and subtropical climates
In warm climates with distinct wet and dry seasons, the best time to plant a tree is at the start of the rainy season. The natural rainfall does much of the watering work and gives roots time to develop before the dry season returns. In regions such as northern India, for example, the monsoon months are traditionally favored for planting saplings.
Quick timing guide
| Climate | Best planting window | Notes |
|---|---|---|
| Cool temperate | Early autumn or early spring | Avoid frozen or waterlogged soil |
| Mild temperate | Autumn to late winter | Bare-root season runs through winter |
| Hot and dry | Autumn or winter | Avoid midsummer entirely |
| Tropical (wet/dry) | Start of rainy season | Water through the first dry season |
Whatever your climate, avoid planting during heat waves, hard frosts, or when the soil is saturated. Check your local forestry or agriculture extension office for region-specific dates.
How to Choose a Tree That Will Thrive
Learning how to choose a tree is just as important as learning how to plant one. The right tree in the right place needs little intervention. The wrong tree will struggle, drop limbs, damage buildings, or die. Take time here and the rest becomes easy.
Start with your climate and hardiness zone
Every tree has a range of conditions it can tolerate. Check your local hardiness or climate zone and choose species rated for it. A tree that is only marginally hardy may survive for a few years and then fail in an unusually cold winter or hot summer.
Prioritize native trees
Native trees evolved alongside local soil, climate, insects, and wildlife. They usually need less water, fewer chemicals, and less maintenance, and they support far more biodiversity than imported ornamental species. Contact a local nursery, botanical garden, or conservation group for a list of native trees suited to your area. Choosing native species is one of the simplest ways to make your planting genuinely sustainable.
Match the tree to its mature size
A tiny sapling hides a very large future. Before buying, research the tree’s mature height and canopy spread, and measure your space accordingly.
- Keep large shade trees well away from buildings, foundations, drains, and power lines. A common guideline is to place them at least as far from structures as half their mature canopy width, and farther for aggressive-rooted species.
- Choose small or columnar trees for narrow gardens and courtyards.
- Remember that overhead utility lines need clearance. Use low-growing species beneath them.
Consider your soil
Trees have different soil preferences. Some tolerate heavy clay, others need sharp drainage. Some prefer acidic soil and others thrive in alkaline conditions. A simple home soil test kit or a lab test will tell you the pH and nutrient levels, and a quick drainage test (dig a hole, fill with water, and see how long it takes to drain) tells you whether water will sit around the roots.
Think about purpose
Ask yourself what you want from the tree:
- Shade: broad-canopied deciduous species such as maples, oaks, or neems depending on region.
- Fruit or nuts: apples, pears, mangoes, guavas, citrus, walnuts, depending on climate.
- Privacy or windbreak: dense evergreens or a mixed native hedge.
- Wildlife: flowering and berry-producing species that feed pollinators and birds.
- Beauty: trees with spring blossom, fall color, or interesting bark.
How to inspect a tree before you buy
A healthy specimen starts life with a major advantage. When you visit the nursery, check these points:
- A strong central trunk with branches spaced evenly around it, not crowded or crossing.
- Undamaged bark with no deep wounds, cracks, or signs of rubbing.
- Healthy foliage or buds appropriate for the season, with no spotting, curling, or insect infestations.
- A healthy root system: For container trees, gently slide the pot off if allowed. Roots should be white or light tan and fill the pot without circling tightly around it. Avoid trees whose roots are wrapped in dense spirals or growing out of drainage holes in a tangle.
- The right size: Bigger is not always better. Smaller, younger trees often establish faster than large specimens and catch up in just a few years.
Buy from a reputable local nursery whenever possible. Locally grown stock is already adapted to your conditions, and you cut down on transport emissions too.
Types of nursery stock
Trees are sold in three main forms, and each is planted slightly differently (we cover this in detail later):
- Container-grown: planted any time the ground is workable and watered carefully.
- Bare-root: sold dormant in winter with no soil on the roots. Economical and fast to establish, but must be planted promptly.
- Balled and burlapped (B&B): field-grown with a root ball wrapped in burlap. Heavy and best handled by two people.
Choosing the Right Spot: Planting a Tree in Your Backyard
Planting a tree in your backyard is a long-term decision. Spend an afternoon observing the space before you pick up a shovel.
Look up
Check for power lines, roof overhangs, neighboring branches, and anything else overhead that will conflict with the future canopy.
Look down
Identify underground utilities before digging. In many countries, you can call a free service to mark gas, water, electric, and telecom lines. Never skip this step. Also keep trees away from septic systems, drains, and sewer lines, where roots can cause blockages.
Look around
- Sunlight: Most trees need at least six hours of direct sun daily. Shade-tolerant understory species are an exception.
- Wind: Exposed sites may need sturdier or wind-adapted species and temporary staking.
- Space: Allow room for both roots and canopy. Roots typically spread two to three times wider than the canopy, although most live in the top foot or two of soil.
- Water flow: Avoid low spots where water pools, unless you have chosen a wetland-tolerant species.
- Neighbors: Respect property lines and consider future shade and leaf drop on adjacent properties.
Mark the position
Use a stake or a spray-painted ring to mark the exact planting spot. Step back, view it from the windows and paths where you will see it most, and adjust before you commit.
Tools and Materials You Will Need
You do not need specialist equipment to plant a tree. Gather these before you begin:
- A sharp spade or shovel
- A garden fork to loosen compacted soil
- A wheelbarrow or tarp for soil
- Gloves and sturdy footwear
- A measuring tape or a straight stick for checking hole depth
- A watering can or hose with a gentle flow
- Organic mulch such as wood chips, shredded leaves, or straw
- Stakes and soft ties (only if staking is needed)
- Pruning shears for removing dead or damaged branches
- Optional: a tree guard to protect against rabbits, deer, or string trimmers
Zero waste tip: Borrow tools from neighbors or a local tool library, use fallen leaves from your own garden as mulch, and reuse old fabric strips or natural fibers as stake ties instead of buying plastic ones. Find more ideas for low-waste gardening at zerowastelifestyle.net.
How to Plant a Tree Step by Step
Now for the main event. Follow this how to plant a tree step by step process and you will avoid the most common causes of failure. Set aside a couple of hours for a single tree, and work calmly. A well-planted tree rewards patience.
Step 1: Prepare the tree
Water the tree thoroughly in its container a few hours before planting so the root ball is moist. If you cannot plant right away, keep it in a shaded, sheltered spot and keep the soil damp. Bare-root trees should be soaked in a bucket of water for one to four hours (no longer than a day) and never allowed to dry out. Protect roots from sun and wind at all times, because exposed fine roots dry out in minutes.
Step 2: Find the root flare
This step is the one most people miss. The root flare (also called the trunk flare) is the point where the trunk widens as it meets the roots. It should sit at or slightly above the final soil level. Nursery trees often have extra soil piled over the flare, so gently brush it away until you can see where the trunk begins to widen. Measure from the flare to the bottom of the root ball. This is the true depth you need to dig.
Step 3: Learn how deep to plant a tree
The question of how deep to plant a tree has a clear answer: the hole should be only as deep as the root ball, measured from the root flare to the base of the roots, and no deeper. Planting too deep is the single most common mistake. It smothers roots, encourages rot, and can slowly kill the tree over several years.
A useful rule is to dig the hole slightly shallower than the root ball, so the top of the root ball sits one to two inches (two to five centimeters) above the surrounding soil. The soil will settle over time, and this keeps the flare exposed to air.
Step 4: Dig the hole the right width
Dig the hole two to three times as wide as the root ball, with sloping sides like a shallow bowl rather than a straight-sided pot. Wide, loosened soil gives young roots an easy path to grow outward, and roots spread horizontally, not downward. Use a fork to break up the sides and base, especially in clay, so the hole does not become a smooth “flowerpot” that roots refuse to leave.
Leave the bottom of the hole as firm, undisturbed soil. If you dig too deep and then backfill, the tree can sink as the loose soil settles. If you do overshoot, tamp the base firmly before placing the tree.
Step 5: Prepare the roots
- Container trees: Slide the tree out of the pot. If roots are circling, use your fingers or a clean knife to gently tease them apart or make three or four shallow vertical cuts down the sides of the root ball. Spread the outer roots outward. Circling roots left alone can strangle the trunk years later.
- Bare-root trees: Trim any broken or damaged roots with clean shears, then spread the roots naturally over a small mound of soil in the center of the hole.
- Balled and burlapped trees: Place the tree in the hole first, then cut and remove the twine, wire basket, and as much of the burlap as you can. Synthetic burlap should always be removed entirely, and treated natural burlap should be cut away from the top third or more to prevent it from wicking moisture away.
Be gentle. Carry the tree by the root ball or container, never by the trunk.
Step 6: Place the tree
Lower the tree into the hole. Rotate it until the best side faces the direction you will view it from, and check that the trunk is vertical by stepping back and viewing from two angles at right angles to each other. Confirm again that the root flare sits at or just above ground level. Lay a straight stick across the hole to check the height quickly.
Step 7: Backfill with the native soil
Refill the hole using the soil you dug out. Resist the urge to add rich compost, potting mix, or fertilizer to the hole. Soil that differs sharply from the surroundings can create a “pot effect” where roots stay inside the improved patch instead of venturing outward. If your soil is poor, amend a wide area of the surface with a thin layer of compost instead, rather than only the planting hole.
Add soil in layers, gently firming each layer with your hands or heel to remove large air pockets. Do not stomp heavily, which compacts the soil. Stop filling when the soil is level with the original ground and the flare is visible.
Step 8: Build a watering basin
Form a low ring of soil, about three to four inches (eight to ten centimeters) high, around the edge of the planting hole. This basin catches water and directs it down into the root zone instead of letting it run away. You can remove or flatten it after the first year or two, once the roots have spread.
Step 9: Water deeply
Water slowly and thoroughly right after planting, until the soil around the roots is soaked. A slow trickle lets water sink in instead of running off. Add more soil if settling exposes the roots, but never bury the flare.
Step 10: Mulch, and stake only if needed
Apply a ring of mulch, keeping it away from the trunk. Stake only if the tree cannot stand on its own or the site is windy. We cover both in detail below.
Planting Different Types of Trees: What Changes
The basic steps stay the same, but each nursery format needs a few special touches.
Container-grown trees
These are the easiest for beginners and the most flexible for timing. The main risk is root circling from years in a pot. Always inspect and loosen roots as described above. Plant at the same depth as the soil line in the container, adjusting for any excess soil above the flare.
Bare-root trees
Bare-root trees are cheaper, lighter, and often establish very quickly because their roots spread straight into your soil rather than a pot mix. The trade-off is urgency: plant within a day or two of purchase, keep the roots wet, and plant while the tree is fully dormant. Spread the roots over a small cone of soil, and plant so that the graft union (on fruit trees) stays well above the soil line, usually several inches.
Balled and burlapped trees
These trees are heavy, sometimes weighing hundreds of pounds, so plan to have a helper and a way to move them. Never lift by the trunk. Always set the ball on solid ground at the right depth, then remove all wire, twine, and non-biodegradable wrapping from the upper portion before backfilling.
Planting multiple trees
If you are planting an orchard, windbreak, or mini forest, spacing matters. Look up the mature spread for your species and plant accordingly. For a dense native mini-forest approach, such as the Miyawaki method, saplings are planted much closer together with a diverse mix of species, and this requires careful soil preparation and regular early watering. It works well in compact spaces and builds habitat quickly.
How to Water a Newly Planted Tree
Learning how to water a newly planted tree correctly can make the difference between a thriving specimen and a dead stick. In the first one to three years, the root system is small and cannot reach far for moisture, so you are essentially its water supply.
The golden rules of watering
- Water deeply, not frequently: Shallow daily sprinkles encourage shallow roots. A slow, deep soak encourages roots to grow down and out.
- Check the soil first: Push a finger or trowel 2 to 3 inches into the soil near (not at) the trunk. If it feels dry, water. If it is damp, wait. Overwatering is as dangerous as underwatering because waterlogged roots cannot breathe.
- Water at the root zone, not the leaves or trunk, so moisture reaches where it is needed and fungal diseases are less likely.
- Water in the morning when possible, which reduces evaporation and gives the tree moisture before the hottest part of the day.
A simple watering schedule
A common guideline, adjusted for rainfall, soil type, and climate:
| Period after planting | Frequency |
|---|---|
| Weeks 1 to 2 | Every 2 to 3 days |
| Weeks 3 to 12 | Once a week |
| Months 3 to 12 | Every 1 to 2 weeks in dry weather |
| Year 2 onward | Deep water during droughts and long dry spells |
As a rough measure, many arborists suggest about 10 gallons (around 40 liters) of water per inch of trunk diameter per week during the establishment period, applied in one or two deep soakings. Sandy soils drain fast and need more frequent watering. Heavy clay holds water, so water less often but check drainage.
Zero waste watering tips
- Collect rainwater in a barrel and use it for your tree. Rainwater is free, soft, and chemical-free.
- Reuse greywater carefully, for example cooled vegetable-cooking water or the first flush of the shower, as long as it contains no harsh soaps, bleach, or salt.
- Make a slow-drip system by poking small holes in a reused bucket or large bottle and letting it empty slowly beside the tree.
- Mulch heavily to reduce evaporation, which cuts the water you need.
Signs of too little or too much water
- Too little: wilting, curling or browning leaf edges, early leaf drop, dry cracked soil.
- Too much: yellowing leaves, soft or mushy soil that smells sour, fungus growth at the base, persistent wilting even though the soil is wet.
The soil is your best guide. Check it, then decide.
Mulching Around Trees the Right Way
Mulching around trees is one of the highest-value, lowest-cost tree planting tips there is. Good mulch holds moisture, moderates soil temperature, suppresses weeds, protects the trunk from mowers and trimmers, and slowly feeds the soil as it decays.
How to mulch properly
- Spread two to four inches (5 to 10 centimeters) of organic mulch such as wood chips, shredded bark, leaf mold, or straw.
- Cover an area at least as wide as the planting hole, and wider if you can. The bigger the mulched circle, the better.
- Keep mulch a few inches away from the trunk: Pull it back so the flare is visible and dry.
- Refresh the layer once a year, keeping depth consistent.
The “mulch volcano” mistake
Avoid piling mulch high against the trunk in a cone shape. Volcano mulching traps moisture against the bark, invites rot, pests, and disease, and can cause roots to grow up into the mulch and circle the trunk. A flat, donut-shaped layer is correct, not a volcano.
Best mulches for a zero waste garden
The most sustainable mulch is the one you already have. Use fallen leaves, grass clippings (in thin layers), chipped branches from pruning, or wood chips from a local tree service, which often delivers them free. Avoid dyed mulches and plastic sheeting, and skip landscape fabric, which can restrict air and water exchange. For more ideas on keeping garden waste out of the bin, visit our guide hub at zerowastelifestyle.net.
Staking, Protection, and Early Care
Do you need to stake a tree?
Often, no. Trees that sway a little in the wind grow stronger trunks and better root systems. Staking is useful only when:
- The tree has a large canopy on a small root ball and cannot stand upright alone.
- The site is very windy or exposed.
- The soil is loose or sandy and the root ball could shift.
If you do stake, use one or two stakes with soft, wide ties that allow the trunk to move slightly. Attach the ties at roughly one-third to one-half of the tree’s height. Check them every few months so they do not cut into growing bark, and remove stakes after one growing season, or two at most.
Protect from animals and damage
Young bark is tender. Rabbits, deer, voles, and goats can strip it in a night. Use a loose tree guard or natural wire mesh cylinder where wildlife is common. Keep lawn mowers and string trimmers well away from the trunk. A mulch ring doubles as a physical barrier, and a small flag or sign helps remind everyone where the sapling is.
Skip fertilizer in year one
New trees rarely need fertilizer. Heavy feeding can burn fragile roots and push leafy top growth before the roots can support it. If a soil test shows a real deficiency, apply a slow-release or organic amendment lightly after the first growing season.
Pruning and Long-Term Tree Care
Prune lightly at planting
Remove only branches that are dead, broken, or crossing. Resist the temptation to trim the canopy heavily to “balance” the roots, because leaves produce the energy a young tree needs to grow roots. Keep the central leader (the main upright stem) intact on most species.
Structural pruning in years two to five
As the tree matures, gently shape it:
- Remove competing leaders so one dominant trunk develops.
- Remove branches that rub, cross, or grow inward.
- Keep lower branches in place for the first few years because they help build trunk strength, then raise the crown gradually.
- Make clean cuts just outside the branch collar, and never leave stubs or use wound paint.
- Prune at the right time for the species. Most trees are best pruned in late winter while dormant, though flowering trees often prefer pruning right after bloom.
Seasonal checkup
Twice a year, walk around your tree and check:
- Soil moisture and mulch depth
- Stakes and ties
- Signs of pests such as chewed leaves, sticky sap, or boreholes
- Signs of disease such as spotted leaves, cankers, or oozing bark
- Any damage from storms or animals
- Small problems caught early are easy to fix. If something looks seriously wrong, contact a local certified arborist or your regional forestry office.
What to expect as your tree grows
Many trees spend their first year or two focusing on root growth, so do not worry if top growth looks modest. This is called the establishment period, and a rough rule of thumb is that it takes about one year per inch of trunk diameter for a tree to become fully established. After that, a well-chosen native tree will need little more than occasional care during extreme drought.
Common Tree Planting Mistakes (and How to Avoid Them)
Here are the pitfalls we see most often, and the fix for each.
- Planting too deep: Fix: find the root flare and keep it visible at or just above ground level.
- Digging a hole that is too narrow: Fix: dig two to three times the width of the root ball, with sloping sides.
- Choosing the wrong tree for the site: Fix: research mature size, sun needs, soil, and hardiness before you buy.
- Ignoring circling roots: Fix: loosen or cut them at planting time.
- Overwatering or underwatering: Fix: check soil moisture before you water and water deeply and infrequently.
- Mulch volcanoes: Fix: use a flat ring of mulch that does not touch the trunk.
- Staking too tightly or for too long: Fix: use soft ties, allow movement, and remove stakes within a year or two.
- Over-fertilizing at planting: Fix: skip it, and test the soil first.
- Planting too close to buildings or utilities: Fix: check clearances and call before you dig.
- Forgetting about it: Fix: put watering reminders in your calendar for the first two summers.
Avoid these ten and you will be ahead of the majority of first-time tree planters.
Zero Waste and Eco-Friendly Tree Planting
Planting a tree can be as low-impact as the tree is beneficial. Here are ways to line up your planting with a zero waste lifestyle.
- Buy local and bare-root where possible: Bare-root trees ship without plastic pots or heavy potting mix, and local nurseries cut transport emissions.
- Return or reuse pots: Many nurseries take back plastic pots. Otherwise, reuse them for seedlings or share them with a neighbor.
- Grow from seed or cuttings: Collect acorns, seeds, or cuttings (where legal and permitted) from healthy local trees. It costs nothing, preserves local genetics, and teaches patience.
- Use free local resources: Take wood chips from tree services, compost from your own bin, and rainwater from your own barrel.
- Skip chemical inputs: Healthy soil, native species, and good mulching reduce or eliminate the need for pesticides and synthetic fertilizers.
- Plant for wildlife: Choose a mix of species that flower and fruit at different times to support pollinators, birds, and beneficial insects.
- Join a community planting project: Local councils, conservation groups, and schools often organize planting days and supply trees and tools, which spreads the benefit across your neighborhood.
Compost responsibly: Leaves, small prunings, and garden trimmings can feed your soil. Avoid sending green waste to landfill.
Small habits compound. If you enjoy this kind of practical, low-waste thinking, explore more on Zero Waste Lifestyle for guides on composting, sustainable gardening, and mindful consumption.
Frequently Asked Questions About Planting a Tree
What is the best time of year to plant a tree?
For most temperate climates, early autumn and early spring are the best times to plant a tree because temperatures are moderate and roots can establish before extreme heat or cold. In tropical regions, plant at the start of the rainy season.
How deep should I plant a tree?
Plant the tree so the root flare sits at or slightly above the surrounding soil. Dig the hole no deeper than the root ball and two to three times as wide. Planting too deep is the most common reason young trees fail.
How far apart should I plant trees?
Spacing depends on the mature canopy spread of your species. As a general guide, plant large shade trees 20 to 30 feet (6 to 9 meters) apart, medium trees about 15 to 20 feet (4.5 to 6 meters), and small ornamental or fruit trees about 8 to 12 feet (2.5 to 3.5 meters). Always check the specific tree’s mature size.
Should I add fertilizer or compost to the planting hole?
Generally no. Backfill with the native soil you removed. If your soil is poor, spread a thin layer of compost across a wide area of the surface and let rain carry nutrients down gradually.
How often should I water a newly planted tree?
Water every two to three days for the first two weeks, weekly for the first three months, and every one to two weeks during dry weather for the rest of the first year. Always check soil moisture first, and adjust for rainfall and soil type.
How long does it take for a tree to establish?
Roughly one growing season per inch of trunk diameter. Most small trees need two to three years of attentive care before they are largely self-sufficient.
Can I plant a tree in a pot or container permanently?
Some dwarf and compact species do well in large containers for many years, but most full-size trees need to be planted in the ground. Container trees need frequent watering, regular feeding, and periodic root pruning or repotting.
Do I need a permit to plant a tree?
On your own private property, you usually do not, but rules vary. Check local regulations if you are planting near a boundary, on a public verge, or in a protected area, and always call before you dig to check for underground utilities.
Why did my newly planted tree lose its leaves?
Some leaf drop is normal and is called transplant shock. It is usually caused by root disturbance, dry soil, or a change of environment. Keep the soil evenly moist, mulch properly, avoid fertilizing, and be patient. Scratch a small area of bark with a fingernail: green tissue beneath means the tree is still alive.
Which are the best trees for beginners?
Native, locally adapted species are best, because they are naturally suited to your soil and weather. Hardy choices such as oaks, maples, birches, neem, banyan relatives, and many native fruit trees tend to be forgiving, depending on your region. Ask a local nursery for a short list.
Conclusion: Start Planting Today
Now you know how to plant a tree the right way. To recap the essential tree planting tips: choose a native species suited to your climate and space, plant in autumn or early spring, find the root flare, dig a wide shallow hole, backfill with native soil, water deeply, mulch with a flat ring, and be patient through the first two years. Do those things and your tree will reward you with shade, beauty, wildlife, and clean air for decades to come.
The best time to plant a tree was twenty years ago. The second-best time is today. Pick your species, mark your spot, and get your hands in the soil. For more practical, low-waste ideas for your home, garden, and daily life, visit zerowastelifestyle.net and keep exploring.
